KickAssYoga

Posts mit dem Label hip openers werden angezeigt. Alle Posts anzeigen

Dienstag, 24. März 2015

HAPPY HIPS: Part 6 BADDHA KONASANA

RECLINED/ SEATED BUTTERFLY - (SUPTA) BADDHA KONASANA

Seated Bound Angle is definitely not a Beginner Pose. Many struggle with it, because sitting upright on the floor is something many people don't do on a regular basis without encountering any sort of back pain. And this is also the problem with Beginner Yoga Classes: these often start seated on the floor, which is contradictory because most people sit the whole day and then they're forced to sit in Yoga AGAIN. Anyway, props are always helpful to sit upright on something (a block, books, blanket...be inventive- use whatever suits you!) without collapsing in the lower back. 
Much easier and way more comfortable is the reclined version where you lie on your back and allow gravity to help you out. You could also use a strap to increase the stretch.


PROPS: 
  • Blanket or Block for SEATED BUTTERFLY
  • Cushions for RECLINED BUTTERFLY 

BENEFITS:
  • Stretches the inner thighs 
  • Stimulates the heart, abdominal organs, ovaries, bladder
  • Improves circulation
  • Supposedly massages internal organs and helps reduce menstrual symptoms
  • Can be practiced even when you've had a meal
CAUTIONS:
  • Do not practice with pain, esp. in Groins or Hips, or with serious knee injuries or lower back pain!


STEP BY STEP: BADDHA KONASANA
  • Sit on your mat (maybe on a block/blanket).
  • Either grab your big toes or open your feet up like a book.
  • Pull your feet in close to you. If this is too much, you can move them further away. 
  • Take a deep inhale, lengthen your spine, Exhale rotate your thighs outward, gently lowering knees further down towards the ground.
  • You can stay upright, if this feels better for your back.
  • Or lean forward, giving a little push through the elbows and maybe rest your head on your feet.
  • Stay for about 10 -20 breaths. Take a break, and repeat another 2 times.


Modification: SUPTA BADDHA KONASANA

  • If SEATED BUTTERFLY is too intense, try RECLINED BUTTERFLY
  • Lie on your back, fold your feet in, soles of the feet together
  • Allow your knees to drop to the sides.
  • If there is too much tension in your groins put 2 cushions, one on each side underneath your knees/thighs.
  • Rest for as long as you feel comfortable, maybe 2-5 Minutes.
  • Focus on deep exhales to let go of what feels tight.


Freitag, 20. März 2015

HAPPY HIPS: Part 5 HALF PIGEON

HALF PIGEON - EKA PADA RAJAKAPOTASANA


One legged Crown Pigeon is your friend. I'm saying this because many people keep struggling with it, and sometimes you just HATE, HATE, HATE it. Plus in this kind of pose, any excuse to come out of it, is legit: either you 'need' a wee really badly or you're maybe even sometimes faking 'knee pain' just to avoid facing the unconfortableness (did I just invent this word?) of PIGEON POSE.


If you do happen to have any kind of knee pain - occasionally I do too - there are a couple of things you can try, like opening the front of the thighs before going into HALF PIGEON or try activating your front foot, as to protect the knee. Some people start fidgeting around, moving the knee closer toward mid line or tense in the shoulders...all this creates more tension instead of trying to release those sweet parts - like the outer part of your ass cheeks... If you start seeing HALF PIGEON as your friend, you can stop fighting it and start enjoying its benefits.


PROPS: 

  • Blanket underneath hip to avoid leaning to one side too much
  • maybe a cushion to rest your head on
BENEFITS:
  • stretches the inner groin and the lower spine
CAUTIONS:
  • do not practice with pain, esp. in Groins or Hips, or with serious knee injuries      
  • if knee pain occurs, switch to shoelace pose                   
STEP BY STEP:

  • From Downdog, Inhale lift your right leg up behind you, exhale place your right shin underneath your belly.
  • Walk your left foot back to lower your hips closer towards the ground.
  • Your right knee is on the right side of your mat, and your left foot on the left side - ideally your right shin would be parallel to the front edge of the mat.
  • This needs time, if it is currently not yet happening.
  • Padding your right buttocks to stop from tilting to one side might help staying centered with your hips.
  • If possible, lie on your forearms or on a cushion.
  • Stay for about 15 breaths on each side or set a timer and hold each side for about 1-3 Minutes.
  • Coming out of the pose: tuck left toes under, and push back into three legged down dog. 
  • Repeat on the other side.
Modification: SHOELACE POSE
  • Lie on your back.
  • Stack your right foot on top of your left thigh, flexing right foot.
  • Interlace your fingers behind your left thigh.
  • If your head and shoulders should start lifting off the ground, place a cushion underneath your head.
  • Or: put you left foot against a wall and move towards the wall so that you feel a nice opening in your right buttocks, without allowing your sacrum to lift.
  • Repeat on the other side.


Note on the side: Count your breaths, so that you can hold both sides for approx. equal amount of time. It is quite common that the left side, the other side is being held for a little shorter while. 


Donnerstag, 19. März 2015

HAPPY HIPS: Part 4 FROG POSE

FROG -  MANDUKASANA

In Part 4 of our YOGA BASICS series, we're looking at a MASSIVE inner thigh stretch, called FROG POSE. (There are various Yoga styles, with numerous names for different postures, so this might be called different then what you've learned or seen, but let's not argue about that...) This one gets the Adductors with almost aggressive intensity that becomes even more important to listen to your body: are you hurting your self or are you benefiting from this position? Start easy and increase slowly, rather than throwing yourself too fast, too deep into the pose. The key is to EASE into your hips.

PROPS: 
  • Blanket/ Padding for sensitive knees
  • Cushion to rest your upper body

BENEFITS:


  • Stretches the inner thighs 
  • Opens chest and shoulders
  • Supposedly therapeutic for menstrual cramps      (I do not have tried it yet for this occasion though)


CAUTIONS:

  • Do not practice with pain, esp. in Groins or Hips, or with serious knee injuries, ankle injuries or lower back pain!
STEP BY STEP:

  • Begin on all fours. Walk your knees out to the sides, hips in line with your knees, so that you feel a comfortable stretch without straining. 
  • If you need more cushioning under your knees, place one knee on your mat and the other one outside of the mat on a blanket.
  • Your shins should be parallel towards each other, feet are flexed.
  • If it feels good, lower your forearms down to the ground.
  • Tilt your tailbone down to avoid arching in your lower back.
  • Keep the back of your neck long. Close your eyes and breathe. 
  • Stay for as long as you can listen to your breath without screaming in agony on the inside.
  • IF you need to scream, do so! Or use lions breath to vent.
  • Over time your knees may slide further apart.
  • Coming out of the pose: Slide your upper body forward, knees together, either roll onto your back and gently pull your knees in toward chest or sit up, knees together. Rest.

Modification: EASY FROG

  • If FROG is too intense, try EASY FROG
  • Although I have heard students call this one harder, you may try and find out your self.
  • Same start: on all fours, knees out to sides, but:
  • big toes touch, lower your feet down to the floor and then try to reach your buttocks towards your heels.
  • Rest your upper body on the floor or on a cushion.
  • Stay for as long as you can listen to your breath, maybe 2-5 Minutes.


P.S. Now you know why the Sticky Mat Label "Manduka Mats" have a little frog as their logo. ;)

Samstag, 14. März 2015

HAPPY HIPS: Part 2 HIGH LUNGE

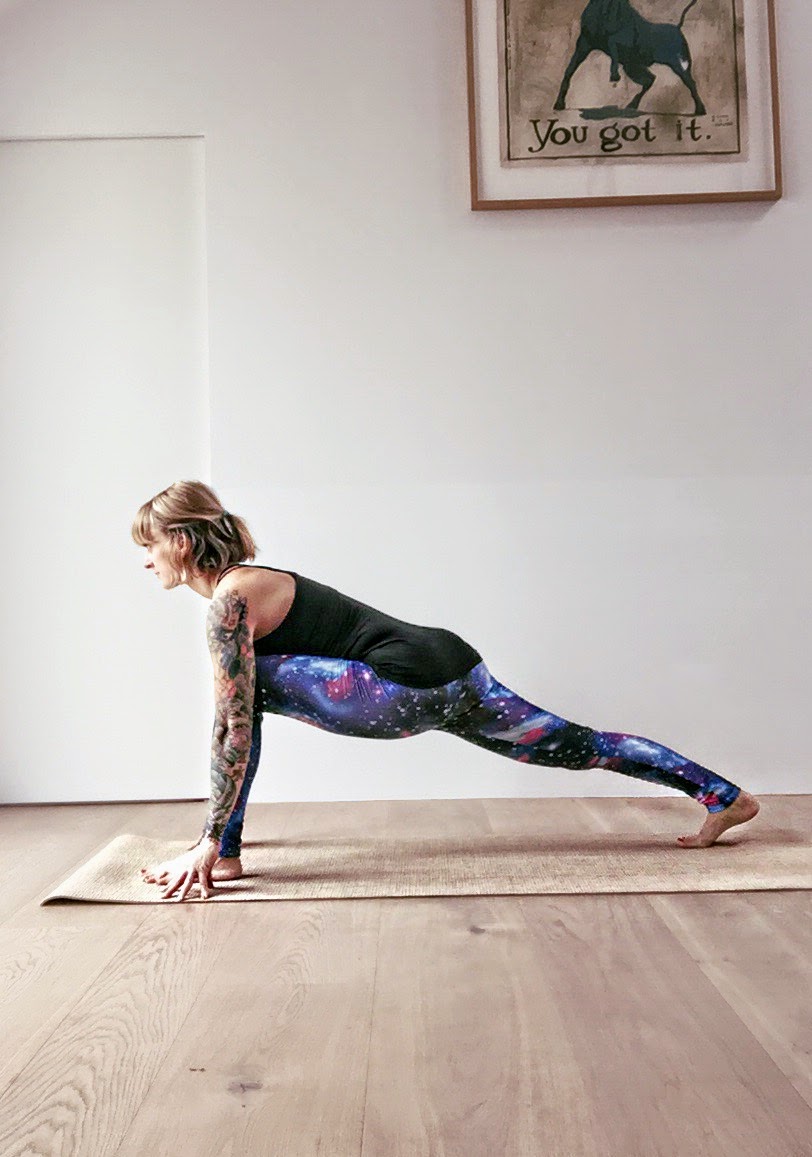
In Part 2 of our YOGA BASICS series, we're looking at another really simple pose, which is HIGH LUNGE. HIGH LUNGE kind of is the advanced variation of LOW LUNGE and  it' s the ground floor, like Prep Work for some of the following poses: Crescent Lunge - also known as Warrior 1, Warrior 1 Twist and Vashistasana. These Follow Up poses involve lifting the torso upright, which leads to backhanding. So, no backbends in this one, groundwork first. We'll see from here. Lunges are great for decompensating the overall lifestyle of sitting on our asses all day. We need to strengthen our legs more and open our hips, which is why I personally love all LUNGES.


Let's look at our base, the HIGH LUNGE:

PROPS: 

  • optional Yogablocks/ or books underneath your  hands.

BENEFITS:
  • releases tension in hips
  • stretches hamstrings, quadriceps, psoas
  • strengthens your legs
  • helps build mental focus

CAUTIONS:
  • do not practice with pain, esp. in Groins or Hips, or with serious knee injuries
  • neck problems ( rather look down at your mat instead of straight ahead)                            

STEP BY STEP:
  • From Downdog, lift right leg up 
  • Exhale step your right foot forward between your hands, aligning the right knee over the heel. Do not allow your right knee to go past your foot, if it does, increase the length of your stance.
  • Come onto you fingertips or blocks and try to arch your back as if you're trying to create a hollow back, just to stop your back from rounding.
  • With every inhale reach your heart forward, lengthening your spine and with each exhale push your left heel back, creating space in your left groin.
  • For more intensity: place both hands on the inside of right foot. Either stay here and try to lower your forearms down (over time!, again: avoid rounding your back) or as shown on the 2nd pic: walk your hands away from your right knee, without allowing your knee to drop to the center, instead push your knee to the right and maybe walk your hands diagonal away from your knee or bring forearms down.
  • Coming out of the pose: walk hands back to center, step right leg back. Switch sides.


Note on the side: Count your breaths, so that you can hold both sides for approx. the equal amount of time. It is quite common that the left side, the other side, is being held for a little shorter while. Stay for about 15 breaths on each side or set a timer and hold each side for about 1-2 Minutes. 


Donnerstag, 12. März 2015

HAPPY HIPS: The LOW LUNGE


The LOW LUNGE - ANJANEYASANA

To start off with the YOGA BASICS Hip Opener series, we'll begin Part 1 with a really simple one, the Low Lunge


(Yes, there is a High Lunge, which I'm going to post as Part 2.) Lunges are part of our basic movement patterns, just a little over exaggerated. Every step you take, while walking, can be a Hip Opener if you activate your Glutes. Over time with certain variations the Low Lunge can get really intense. And as I have recently learned: through new scientific reasearch regarding the topic of stretching the FASCIA with Yoga, it's really good for your Neuro system to change the way you practice from now and then, so that your system can adapt and grow through new input/ new challenges. As I said before in the Intro to this series, I am showing you variations of Hip Openers that are EASY for your lower back. In classic ANJANEYASANA the torso is upright, the arms reach for the stars, possibly you sink deeper into the groin. This needs to be done with perfect care and good alignment for your lower spine. I am purposely leaving this out, for now. 


PROPS: 

  • optional padding/ blanket underneath the kneeling knee.
  • optional Yogablocks/ or books underneath your  hands.

BENEFITS:

  • releases tension in hips
  • stretches hamstrings, quadriceps, psoas
  • strengthens your knee
  • helps build mental focus

CAUTIONS:

  • do not practice with pain, esp. in Groins or Hips


STEP BY STEP:

  • From Downdog, lift right leg up into Eka Pada Adho Mukha Shvanasana (One Legged Downdog) 

  • Exhale step your right foot forward between your hands, aligning the right knee over the heel.

  • Lower your left knee to the ground (optional padding), keeping the right knee in place.
  • By pressing down the ball of my back foot, you can increase the length in your left groin. 

  • You can also drop the top of the left foot flat.
  • Palms or fingertips down, optional Hands on Blocks.
  • With each inhale imagine lengthening your spine forward, dropping your tailbone toward the floor, lifting your pubic bone up, towards your navel.

  • With each exhale sink into your Hips.
  • Inhale lift your left knee off the floor, Exhale step back into Downdog.
  • Repeat on the other side.

Note on the side: Count your breaths, so that you can hold both sides for approx. equal amount of time. It is quite common that the left side, the other side is being held for a little shorter while. Stay for about 15 breaths on each side or set a timer and hold each side for about 1-2 Minutes. 


Dienstag, 10. März 2015

YOGA BASICS: Happy Hips

7 Tricks for Happy Hips

I am introducing my new series called Kick Ass Yoga Basics and I will be starting off with the 7 most important Hip Openers. There are many more, but I handpicked these because they are Beginner friendly and still challenging for Pros as well, without crossing the line from Hip Opener to Back Bend for all of those who find Backbends very challenging.

Since I don't really believe in overall Levels like "I've been practicing for years, therefore I'm Level 4", I'd like to be clear that I do believe that each one of us owns different kinds of "Levels" of strength or mobility in their bodies.


These following 7 important Hip Openers are divided into easy, medium and tough versions so that you can pick your own Variation for each day.

When practicing Hip Openers it is really interesting to find out where the so called comfort zone ends and hard work begins without straining yourself. Practice without pain.

1. Low Lunge
2. Crescent Lunge      = ANJANIYASANA
3. Happy Baby Pose   = ANANDA BALASANA
4. Half Pigeon            = EKA PADA RAJAKAPOTASANA
5. Frog                      = MANDUKASANA
6. Seated/Reclined Butterfly = SUPTA/BADDHA KONASANA
7. Firelog Pose           = AGNI STAMBHASANA

Props required: maybe a blanket, maybe 2 Blocks.

I will be discussing poses that are Hip Openers who require a deeper understanding of being able to perform Backbends without the risk of injuring yourself, like Camel Pose, Hero, Hanuman, Setu Dhanurasana, Urdva Mukha Svanasana...in the next Basics Series.

I will be starting with the first one in my next post, which is easy yet intense: Low Lunge.

See ya! J